Why Does A Two-Hour Shoot Cost So Much?!
All images and text are Copyright © 2015 James Wang
20 May 2015
Nowadays, many people are used to taking photos with a cell phone. It’s simple: just point, say, “Smile!“, hit the shutter, it clicks, and you’re done. You can even press the Send button to post it. Total time: ten seconds. So why does a portrait or glamour session cost so much? Let’s see: 10 seconds times 30 photos equal 5 minutes. What’s the big deal?
The “big deal” is that to create professional portraits takes a whole lot more than just the time clicking the shutter. There’s a lot to do before and after the shoot to produce good results. Consider that it only takes about 5 minutes to pick up a Quarter-Pounder at McD’s; if what you seek is a gourmet meal, it takes a lot longer to get a filet mignon at Mr. A’s.
Let’s take a look at what other efforts are involved that you may not be aware of. We’ll cover most of them in general terms because they’re not easily quantifiable or directly associated with a specific shoot, but nevertheless have costs that must be recovered. Then we’ll go over an example of the post-processing steps that must be done for each image.
Education and Experience: People often attribute the quality of photographs to the camera rather than to the photographer. That’s like attributing the great writings of Ernest Hemingway to the quality of his typewriter, or thinking that it wasn’t Leonardo but rather his paintbrushes that created the Mona Lisa. It’s the difference between necessary conditions with sufficient conditions: sure, da Vinci needed good paintbrushes to paint the Mona Lisa, but the paintbrushes alone were not sufficient.
The single most important part of a camera is twelve inches behind it. – Ansel Adams
It takes years of experience and education to learn how to take good photographs. Learning to use the equipment is only a small part of that: sure, you need to be technically-competent and fluent with the tools at your disposal, but learning how to work with light is a product of hands-on experience. Knowing how to press the button on an expensive camera doesn’t make you a great photographer, just as knowing how to type on a Smith-Corona doesn’t turn you into Hemingway. The education and experience factor is analogous to the experience you’d expect your doctor to have; it takes years of learning and has definite costs. If you need surgery, would you rather go to a doctor who learned his trade at medical school and has years of experience, or would you rather save a few pennies and go under the knife with someone who’s just read Medical Practice for Dummies?
As we’ll see below, post-processing of images is an essential component. In film days, Ansel Adams likened the negative to the score of a musical piece, and the print to the performance – both are necessary and complementary. Updating his analogy to digital photography, the raw image is the score, and the post-processed image is the performance. Image-processing software takes the place of the darkroom. And like the darkroom, it takes time and experience to master the software tools.
Equipment and Software Costs: Photographic equipment has definite costs, and it doesn’t last forever. The analogy with medical practice: medical equipment costs a lot, and your doctor has to recover its costs somehow. She may not wear out her stethoscope on your visit, but it still has a finite lifetime. It’s not just the photographic equipment either: computer hardware and software are just as necessary as lights and cameras. Maintenance and backup of computer equipment with contingencies for failures is time-consuming, but necessary in case of the inevitable disk crash. Photographers must be computer administrators as well. These are overhead costs that must be covered by direct revenue.
Preparation: Any shoot requires a fair amount of preparation. Many of these are mundane administrative tasks such as marketing, scheduling, and coordinating with essential people such as hair stylists, makeup artists, and production people. There are technical requirements such as making sure that all the equipment is ready to go, that batteries are charged, that memory cards are available, that computer resources are sufficient, that there are backup resources available. Just as there are a million ways a shoot can go wrong, there are a million things to check to assure that they don’t. And contingency plans for if they do. More overhead costs, but all are mandatory.
Hair and Makeup: Of course, you want to look your best when you’re the subject. And that means getting hair stylists and makeup artists. They have their own costs for time and materials, but they can make a tremendous difference. Here’s an example with Jamie:
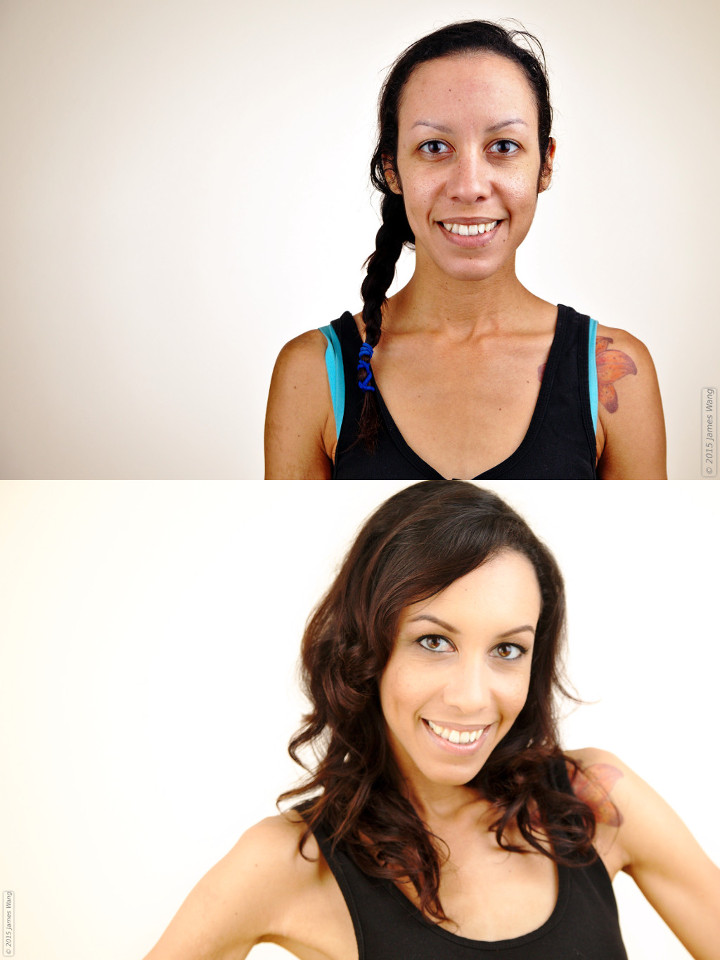
Jamie, Before and After Hair and Makeup
Hair styling and makeup are not optional: they make such a difference, they are required.
The Shooting Session: I won’t describe what goes into a session, because renowned photographer Tamara Lackey expressed it so well:
This is where you go out and not only think about taking great photographs, but also pour all your energy into finding innovative, fresh poses that don’t look posed while constantly keeping your eyes open for fantastic candid moments while brushing back hair and wiping away snot and staying ever-cognizant of using great lighting, even as it shifts and changes, bringing in fill lighting and rim lighting as needed, while you are scanning for the most interesting backgrounds and foregrounds, shooting flattering angles but also mixing it up and composing and framing as impactfully as possible with as much variety as possible while engaging your subjects individually, based on their specific personality types that you have been told about, as well as that you’ve surmised, taking care to represent families as a one, as a collective grouping of individuals who belong together, being sure to adjust your settings to keep any collection of multiple individuals in the same plane of focus, avoiding glass glare and errant color casting, or any sort of under- or over-exposure, adjusting your ISO, shutter speed, aperture, exposure metering and white balance as you go, while of course keeping in mind everything they wanted from the shoot, the things they told you and the things they didn’t, while referencing a list, either in your head or on a piece of paper or on your phone, of everything you wanted to get so you don’t miss out on any configurations that they might want when it comes down to showing them all the options for what you’ve captured while you are consistently responding to the energy of the unique dynamic that is each shoot as you create an experience that is exciting, relaxed, fun, upbeat, interesting, and, of course – lest we not forget – comfortable for all.
It’s tempting to say, “Well, it’s easy for you, all you have to do is push the shutter button.” But experts always make “it” look easy. Venus Williams makes tennis look “easy.” Tiger Woods makes golf look “easy.” Keith Jarrett makes playing the piano look “easy.”
Image Selection: A typical photo session yields hundreds of images. Only a fraction of these (the best, of course) are needed: many of them may be redundant. So the first step is to select the best. Culling can be time consuming since images must be compared to other similar images in the same set. A typical time is 20-30 seconds per shot. For instance, for 300 images, it may take 100 to 150 minutes to initially sort them.
Post-Processing: Post-processing renders the final image – it’s the performance. Here’s why: when you press the shutter button on your camera, it scans the pixels on its sensor and records the red, green, and blue intensities of the incident light. But that’s not the photograph, or at least it’s not a pleasing photograph. At the very least, the image has to be compensated for the fact the camera sensor responds linearly to light intensities, while our eyes and our visual perception respond logarithmically. The image out of the sensor is the raw image. This image is not usually seen or even available on celphone or point-and-shoot (P&S) cameras: it is automatically post-processed by the camera to yield a JPEG image. In many cases the automatic processing is “good enough”, in the same way that a Quarter-Pounder is “good enough”: it’s edible, it placates your hunger cravings, and it may even provide some nutrition.
But if you want the best meal possible, an automatic process won’t do: your cooking must be tailored to the specific circumstances. Is the meat tender? How lean is it? Are the vegetables fresh from the farmer’s market, or were they picked days ago?
Similarly, image post-processing is best tuned for each image: is the exposure correct? Is there enough contrast? How about the white balance? Are there dust spots? Does it need cropping? Vibrance? Dodging? Cropping?
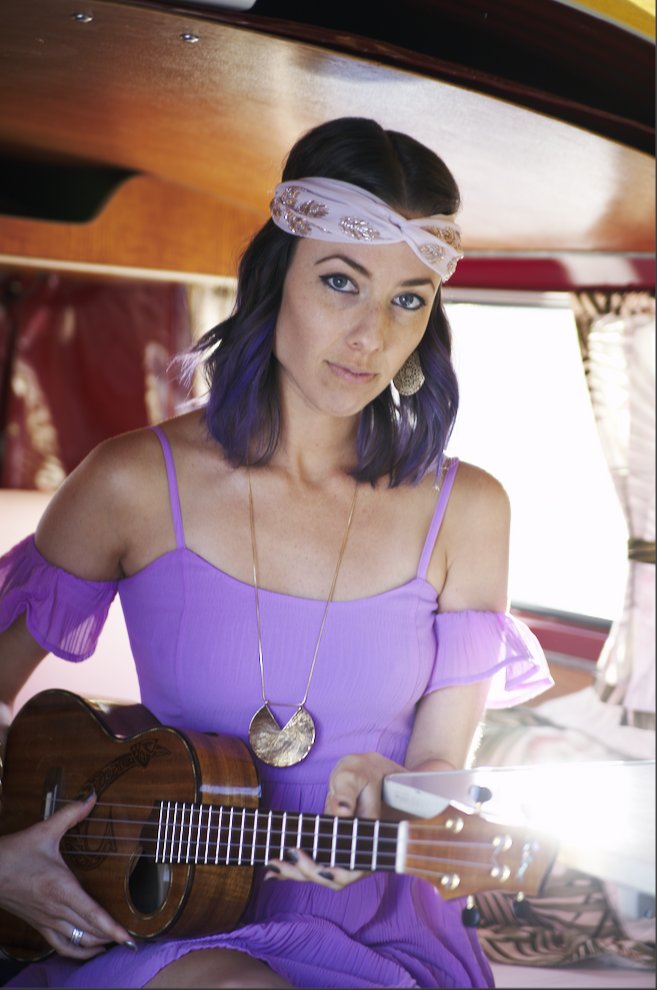
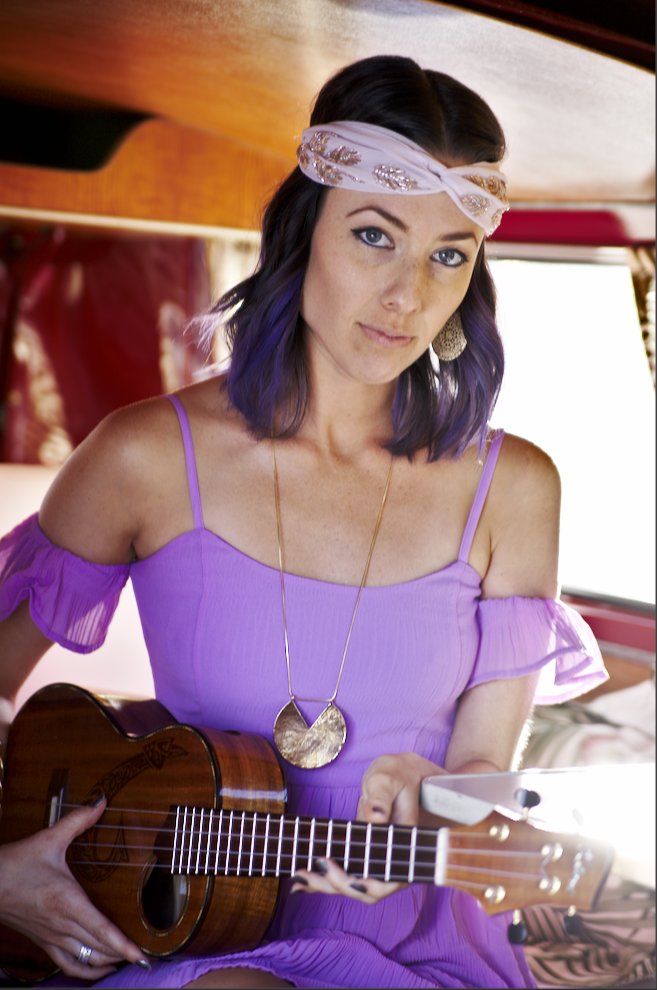
As an illustration of a typical post-processing sequence, we’ll use an image of Lauren, taken at a car show. The context: she’s a flower girl with her mandolin inside a pristine ’65 VW camper bus.
Here’s the JPEG image that the camera produced, it’s straight-out-of-camera (SOOC) except for resizing to fit on this web page (bear in mind that this photo was taken with a DSLR and not a cell phone, so it’s already incurred some costs that a snapshot would not):

Straight Out Of Camera (SOOC)
Not bad, really: the camera’s JPEG algorithm applies a default correction curve to accentuate the contrast and make it non-linear to match our perception. For a snapshot, it’s more than adequate to recall memories of an event – that’s what most snapshots are for. In comparison, here’s what the raw image looks like:

Raw image
Pretty blah, isn’t it? That’s because linear sensor curve is flat compared to the logarithmic response of our eyes. So why start with the raw image? It’s because the raw image contains much more information about the light comprising the image than the JPEG does. In this case the JPEG image is really quite good SOOC, but if extensive manipulations of it were necessary, the depth of the raw image allows much more latitude and quality. Compare the versatility of cooking from scratch versus cooking a TV dinner: it takes a lot more work and time, but you have a lot more control and can create a much better meal.
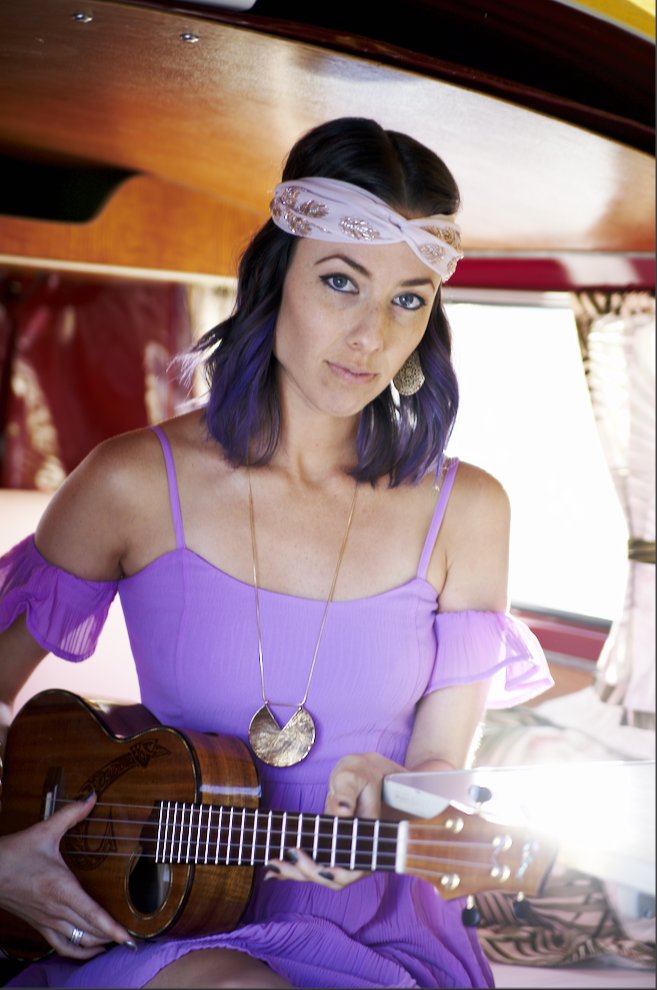
The first step is to apply a camera base curve to more accurately match visual perception. Every camera has a different base curve, and since I have a Canon EOS camera, I apply the Canon curve (actually, the software provides two Canon curves, so I apply the newer one):

The RAW image with the Canon base curve applied
Compared to the original raw image, it looks better already. But the exposure on Lauren is a little dark. The camera’s exposure meter was probably influenced by the window behind her; it’s in full sunlight. Considering the circumstances, the meter did fairly well. But here’s the same photo with a 1/4-stop exposure added:
Increasing the exposure by 1/4-stop brightens the whole image
The camera’s default white balance looks pretty accurate. But the camera doesn’t know anything about what mood we prefer. Let’s try a warmer tone and increase the color temperature by 200K:
Color temperature increased by 200K
The wood tones are really enhanced, and Lauren’s skin tones look more realistic. There’s a lot of non-functional distracting space around Lauren, so let’s crop some of it out:

Cropped image
Now let’s adjust for shadows and highlight tones. The highlights from the sunlit window behind Lauren are way too hot, so let’s turn them down just a touch. The shadow detail is good, but if the shadows are darkened a bit, then the apparent contrast of the image is increased:
Highlights dimmed and shadows brightened
Close to done – the changes are getting subtle at this point. Let’s increase the vibrancy of the colors:
Added Vibrancy
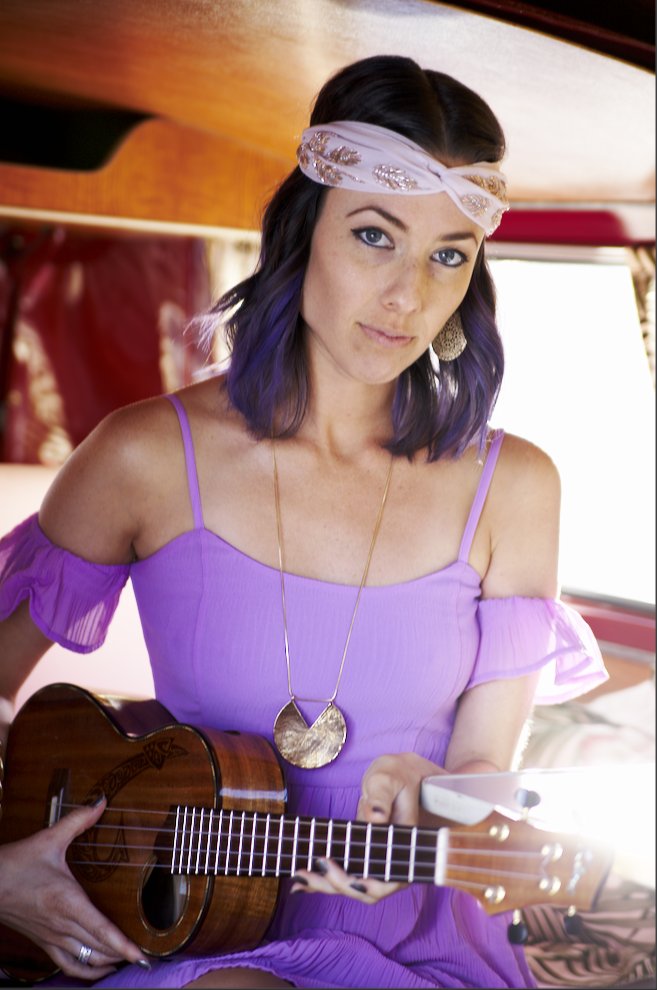
and one final curves adjustment to increase up the contrast and effectively sharpen the image:

Adjust tone curves
Finally, here’s a side-by-side comparison of the SOOC JPEG and our hand-processed one:

Camera JPEG Image

Raw image, manually processed
The post-processing on this image was pretty simple and not exceptionally time-consuming. Fluent proficiency with the image tools (darktable and GIMP) allowed all the steps to be completed in about ten minutes. Other images need considerably more care and handling. They may have serious exposure problems, or the contrast may be too extreme. The lighting may not be optimal so some parts need dodging or burning. Color correction may be necessary. There may be inconvenient objects, shadows, or spots that need correction. Thus post-processing may range from 10 minutes per image to well over an hour for complex ones. An average time may be 15 minutes per image. That means that to post-process 100 images, it could easily take 25 hours.
So what’s the big deal with such a high price for a session that only lasts two hours? It’s simple: those two hours are only a small fraction of the direct costs of producing superior images. It not only takes a great deal more time that is directly associated with the session (10 to 15 times more is not unreasonable), but there are also significant indirect costs incurred even before the shoot is scheduled. Would you like going into surgery with a “doctor” with minimal experience who operates with a used, dirty scalpel, or would you rather go to one who is current in medical practice, and has well-maintained equipment?
It’s your choice – there are plenty of “photographers” who will shoot you in for an hour or two and provide images to you on a CD for not much money – just remember, you pay for what you get. If cost is your main criteria, go to McD’s. If quality is what you seek, go to Mr. A’s.
What do you think? Are photographers justified in charging so much for pressing the shutter button? Is it fair to ameliorate the cost of camera and computer gear passing some of the costs onto customers? Leave your thoughts in comments below.
